Laminate Flooring Pros And Cons

This Is How To Clean Laminate Floors The Right Way

Laminate floors are a fantastic choice for any high-traffic home. Not only are they attractive, but they can stand up to the wear and tear that comes with having kids, pets, and a busy household. All that’s needed to keep them looking like new is regular cleaning.

Despite their durability, though, laminate floors don’t respond well to many of the cleaning techniques used on hardwood or vinyl. Harsh chemicals and abrasive scrubbers can damage the surface, and the buildup from wax or polish can leave your floors looking dull.

Want to learn how to clean laminate floors without doing any harm to them? Read on for a quick and easy guide to laminate floor care.

Laminate Floor Cleaning: What Not To Do

The first step in figuring out how to clean laminate hardwood floors is understanding how not to clean them. The composition of laminate flooring (a layer of compressed wood particles topped with a plastic veneer) makes it sensitive to heat and moisture.

Here are some common cleaning methods to steer clear of using on a laminate wood floor.

Avoid Water

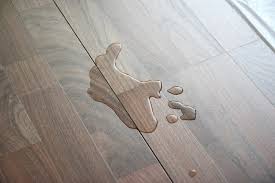
The composite layer of laminate is made of wood particles packed tightly together and bound with adhesive. It absorbs moisture as much as (and sometimes more than) solid wood planks. The flooring expands when it soaks up water and can warp, bend, bubble, or even separate the seams between planks.

The top layer of laminate flooring is water-resistant. Even so, water can seep through the cracks between planks if it’s left to sit.

This means you should avoid cleaning laminate floors with large amounts of water like with a traditional wet mop. If water or another liquid does spill on the floor, wipe it up as soon as possible.

Avoid Heat

The top layer of laminate (called the “wear layer”) is made of a thin sheet of textured plastic. High heat can melt the plastic and disrupt the texture, cause the wear layer to peel off, or weaken the adhesive holding the composite layer together.

Because of this, you should avoid using a steam cleaner on laminate floors at all costs. The combination of heat and moisture can do permanent damage to the floor after only one cleaning.

Avoid Scratches And Buildup

While scratches won’t damage the integrity of your floor, they can dull the laminate’s natural shine. Avoid using these cleaning tools to prevent scratches and chips:

  • Steel wool
  • Stiff-bristled scrub brushes
  • Woven plastic scrubbing pads
  • Heavy vacuum cleaners, especially ones with a brush
  • Abrasive cleaners

Along with scratches, floor waxes and polishes can also make your floor look dull when they build up over time. Try not to use oil- or ammonia-based cleaners made for hardwood floors. Soap can also leave a film behind, so use it sparingly and always remove the residue before it dries.

How to Clean Laminate Floors

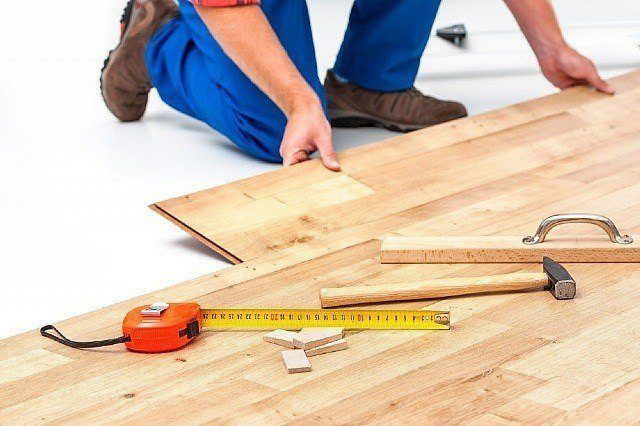
Once installed, laminate must be properly cared for to keep it looking as good as day one. Read on for our tips for cleaning your laminate floors.

Laminate flooring is a popular feature in many homes. Once considered a basic, economical choice, laminate has become much better looking over the decades, and some options are nearly impossible to distinguish from real hardwood—making it a functional and stylish choice. Laminate flooring is also durable, so it’s great for homes with kids and pets. But once installed, laminate must be properly cared for to keep it looking as good as day one.

Sweeping and Vacuuming

The most important aspect of cleaning your laminate flooring is regular care, and the first step is to consult your manufacturer’s instructions.

Generally, though, weekly sweeping or vacuuming will not only keep your floors from looking dirty, but will reduce the need for harsher, deeper cleans down the line. One part of laminate flooring to be mindful of is its top (or “wear”) layer. Made of a plastic, it guards against dogs, shoes, furniture, and other potential sources of damage. Though very durable, it’s important to take certain precautions to protect this layer when cleaning your floors.

Always use your vacuum on the “hardwood” setting to prevent the beater brush from spinning, and always use the vacuum’s soft brush attachment. Never use steel wool or other abrasive materials on laminate flooring, as doing so will damage that top wear layer.
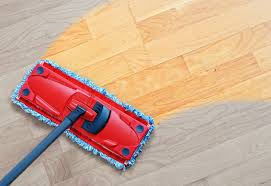
Mopping

Laminate floors are not waterproof, and excessive moisture can cause major damage. (Among other issues, too much water can weaken the floor’s adhesive, causing bubbling.)

That said, it’s perfectly safe to mop your floors if you do so with care. It’s best to use a slightly damp, not wet, microfiber laminate mop, but a regular mop wrung out as much as possible works, as does a spray mop. Wipe down the floors with a dry cloth after mopping to remove any excess water; never let liquid pool on your floors. For best results, use a cleaning solution specifically made for laminate floors or a DIY option.

While some may say it’s okay to occasionally steam clean your laminate floors, most experts agree that it’s a bad idea. Steam cleaning requires high heat and lots of moisture—two things that laminate flooring doesn’t like.

Spot Cleaning

Don’t worry if you spill on your laminate floors, just be sure to wipe up the mess right away. Paper towel, a microfiber wipe, or any other soft, absorbent cloth will work just fine (remember, you don’t want to use anything coarse or abrasive and risk scratching the surface).

For a tough stain, it’s ok to spot clean with a little bit of cleaning solution. Additionally, it’s safe to use acetone (nail polish remover) on laminate flooring, which is a good way to remove oily or colored stains, like ink, lipstick, or marker (this is especially useful for folks with kids who like to draw on everything; acetone should get out even the toughest marks).

Dab a small amount of acetone on the area, then wipe immediately with a damp paper towel or rag. Repeat until the stain is gone.

Clean Up Spills Quickly And Dry Your Floor Thoroughly After Mopping.

Remember, liquid and laminate don’t mix well. To wipe up surprise spills or dry the floor after a mopping session, use a clean, dry microfiber mop (it makes sense to keep a few on hand). Stains such as red wine or ink can be cleaned with a small amount of nail polish remover or rubbing alcohol, but test in an unobtrusive area first.

Take protective measures, like banning stilettos.

Place mats or small rugs under potentially leaky objects like houseplants and pet bowls and use adhesive felt pads on the undersides of furniture to protect the floors from scratches.

High heels can leave irrepairable pockmarks in laminate floors, so it’s smart to make a no-shoe policy for family members and guests. It also protects your floor from excess dirt and sand, which can damage it over time — not to mention the crazy-high amounts of bacteria one pair of shoes can acquire in a single day.

Cleaning Small Messes And Scuffs

After you sweep up any dry dirt or hair, most small messes can be cleaned up with a damp microfiber cloth. You can either use plain water or dilute some white vinegar or rubbing alcohol. Remember to avoid pouring liquid directly on the floor when cleaning.

For stubborn spots or areas of buildup, some people turn to glass cleaners like Windex. This method is helpful in a pinch, but use it sparingly and only in small areas. Spray the glass cleaner on a microfiber cloth and rub the floor clean, going with the grain whenever possible.

Drips of candle wax or chewing gum will scrape off easily with a credit card if you freeze them with an ice cube first. For shoe scuffs, try rubbing the area with a dry tennis ball before reaching for cleaning chemicals.

Cleaning The Entire Laminate Floor

The best way to clean an entire room with laminate flooring is to use a damp microfiber or spray mop such as a Swiffer. These pick up dirt and grime without leaving streaks or pools of water. When washing a reusable mop head, don’t use fabric softener, as this can leave residue behind the next time you clean the floor.

Easy to Care For

Maintaining laminate flooring is easy, you want to vacuum the flooring weekly using a soft brush attachment to prevent it from scratching the flooring and simply spray a mist of the recommended cleaner onto small sections of the flooring at a time and wipe using a Micro-fiber cloth mop or clean dry rag. Avoid the impulse to purchase floor cleaners you see on grocery store shelves as they may be generic products that can harm your particular floor’s finish or appearance.

Get the Grit Up

Use good bristle doormats at all entrances to trap small stones and dirt before it has a chance to get ground into the surface of the finish. If the floor is left unattended grit and dirt will become embedded into the worn unprotected surface of the flooring causing ugly dark areas within the floor. We also highly recommend using Chair Glides to protect your laminate flooring from being scratched by chairs and other furniture using them will also make it very easy to slide out heavy furniture for cleaning. Furniture manufacturers usually only provide cheap undersized casters on their furniture which can cause damage to your Laminate flooring. Although laminate flooring is extremely durable manufacturers do not warranty their flooring against indentations in the surface caused by anything being rolled or dragged over the surface. We would suggest replacing any hard plastic casters with wider rubber casters that will not indent or mar the laminates surface. Spiked/Stiletto heeled shoes can also indent the surface of the flooring.

Wipe Up Spills

Make sure to clean up liquid spills as soon as possible. Even with the super tight seams of today’s laminate flooring, standing liquid can seep into the seams of the panels causing delamination and/or cupping of the edges of the boards and discoloration of the flooring itself. Spills should be wiped up right away.

Never Ever

how to clean hardwood floorsNever Use: Water and/or Vinegar, Furniture Polish, Wax-Based products, Detergents, Bleach, Polishes, Oil Soaps, Abrasive products or Acidic materials to clean laminate flooring. These will leave a dull film on the surface of your floor which will be difficult to remove in the future. Never use any abrasive cleaners, steel wool or scouring powders when cleaning your laminate flooring. It is also recommended to never use any kind of mechanical steam cleaner as excessive heat and moisture can cause delamination or other damage to the finish.

What Makes A Great Wedding Videographer

Questions to Ask Your Wedding Videographer

Many people find it difficult to select the best provider of wedding photography and videography services. They start with the portfolio, they meet the professional in person and they ask questions. There are numerous important questions to ask the wedding videographer in order to build rapport and trust. As a professional, you should be thoroughly prepared for such inquiries.

The wedding day is so very special and people don’t want to mess things up through the selection of the wrong service provider. Hence, you should give your potential customers an opportunity to communicate with you and get their questions answered. All wedding videographers should be prepared to answer some of the most common client inquiries.

Here are some of the most important questions to ask the wedding videographer and the type of information that clients would be anticipating in return.

What’s Your Videography Style?

That’s one of the first questions clients like to open up the conversation with.

There’s a simple reason behind the inquiry. Most people have a pre-conceived notion about their wedding. They can imagine the venue, the reception, the wedding dress and the party. They also have a clear concept of the wedding video. While clients tend to already have some idea based on your portfolio, it’s still essential to provide more details. Tell them about the styles you work with and show some samples. A visual explanation can be much more impactful, especially if prospects see something that they like.

As a professional, you may end this conversation with a question about what the client anticipates. Brides and grooms who can verbalise the wedding style they want will be providing you with a ton of beneficial information you can use during the work process.

What’s Your Experience and What Equipment Will You Use?

Some of the most important questions to ask the wedding videographer focus on the experience of the professional. Clients may also have some inquiries about the equipment you’ll use to give the best possible outcome. When answering such questions, understand the fact that most people aren’t well-versed in the technical side of things.

Keep the explanation simple and straightforward. You can highlight the number of years you’ve been in business, the qualification courses you’ve done or the investment in special kinds of equipment. Presenting equipment can be a bit tricky so do share something about the brand and the qualities of the respective camera or the lens you’re going to use. Tell people what types of videography the equipment is suitable for and once again – show some actual samples.

Do You Do Wedding Photography, As Well?

Planning a wedding can be really stressful. Most couples have to deal with dozens of things so they’ll be looking for opportunities to simplify processes. Very often, couples prefer to have one team handling wedding photography and videography.

Hence, you’ll probably be asked about the provision of photography services, as well. It’s really up to you to determine whether you’ll offer multiple solutions or specialised packages to your clients. If you don’t offer photography services, you may want to recommend someone you know.

What Is The Different Between Cinematography And Videography?

In recent times, more and more Wedding Videographer try to distinguish and claim themselves as Cinematographer. Technically, it may not be the correct term, however it all depends how you interpret or define Cinematography and Videography.

I personally think that the term Cinematographer is strictly for those who works in a film set, and Videographer is basically the person who capturing video. Therefore, technically speaking, the term Videographer is more accurate to describe the person who capture an event, such as wedding. However, aesthetically modern Wedding Video is pretty much a short film of a wedding. Therefore, there is nothing wrong by claiming to be Wedding Cinematographer, as generally they produce short film of the wedding they shoot.

In saying that, there are lots of great wedding production company that call themselves Wedding Videographer that is as good (aesthetically) as wedding production company that call themselves Wedding Cinematographer. What more important is the work that they do suits your style and taste, whether they claim to be Wedding Cinematographer or Wedding Videographer.

How many videographers do I need to capture my day? Will the videographer(s) be unobtrusive on the day?

Filming a wedding is always a fine balance between capturing the shot and being as unobtrusive as possible, especially during formality. As much as we want to get the best angle or the best framing, we also don’t want to block the view of your parents when you exchange vows.

Therefore, I think two videographers are enough for most weddings. I myself normally shoot alone, with two cameras during most formalities if possible. One unmanned on the tripod, one roam around with me to get the different angles and reaction shots. We also try our best to be as discreet as possible. This is again to ensure that we won’t disrupt the most important moment in your life.

How did you get started filming weddings? How long have you been in the weddings industry?

You want to know how many years of on-location experience a wedding videographer has on the resume. Experience is everything. Find out how long the videographer has been editing wedding videos and if they continually train themselves and/or their staff.  Asking about his or her industry connections ensures that a videographer values working with others as a team of wedding professionals. He/she should have an excellent reputation among other local wedding vendors. A seasoned pro easily answers this starting question.

How do you handle the music for the wedding film?

Does the videographer license music or just use stock sound. Will you be able to choose the music? You do not want to hate the music placed over/used in your film.

What package is best for me?

Have a little peek at what packages are available, see what works within your budget. Find out if your can upgrade at a later date to a bigger package. This is also your chance to get informed on what the packages include, are there extra fees for travel and accommodation etc.

How many hours will you be there?

This ties in with packages, if your videographer is going to be there for set hours, are you fitting everything you want captured into those hours? You may need to book them for extra hours if not. Also keep in mind things can easily run over time on your day.

How long do I need to schedule in for portraits sessions

Each videographer will be different, most usually follow the photographers lead on this, but some may want to stage things separately. Double check with each of them to work out how much time you’ll need to schedule in for portraits. This is our favourite part of the day, so we always suggest to leave between half an hour to an hour. We find the day is such a rush, that our clients really enjoy this downtime part where they get to soak each other in (and make out lots obvs).

What details do you need from me?

We basically need to know where we’re going and what time we need to be there. A plan of the day is essential! It’s important to keep your videographer informed on shots that are important to you too. There is no such thing as too much information.

Tips For A Successful International Local Moving

Moving Guide

Cancel

Newspaper delivery

Milk delivery

Telephone

Internet

Cable

Gas

Electricity

Water

Other

Get organised

Obtain a supply of boxes from places like the supermarket

Obtain packaging tape and heavy marker pens

Arrange for a furniture removal van

Arrange transit insurance

Arrange for care of your children on moving

Make suitable arrangements for any pets

Arrange contents and fire insurance for your new home.  Talk to your Harcourts consultant regarding this.

Organise shifting times with the purchaser of your old property and the previous owner of your new one.  Your Harcourts consultant will help co-ordinate this.

Notify your change of address to

Bank

Credit card companies, i.e. visa, diners, fuel cards

Post office for redirection of mail

Registrar of electors (at Post Office)

Registrar of motor vehicles & drivers license

Tax department

Insurance companies (house, contents, car, health etc)

Hire purchase or finance company

Investment companies

Local council

Shops where you may have charge cards

Clubs and organisations

Police (if you own and store firearms)

Friends

Relatives

Publications you subscribe to

Doctor

Dentist

Church

Accountant

Who else sends me mail?

Remember to

Clean the stove

Defrost the fridge/freezer

Tidy the yard

Ensure that the chattels that have been sold with the property aren’t accidentally packed

Disconnect all appliances

Disconnect the TV aerial

Return any borrowed items

Throw out items that you don’t intend taking with you (organise garage sales)

List valuable items for special care when moving

Advise removal company of dangerous goods being moved i.e. ammunition, petrol, spirits, chemicals

Securely pack all jewellery, money, special documents and papers (i.e. legal, tax, insurance etc)

Set aside items you will need on the day of the move so you can take them with you, e.g. food, drinks, cleaning products

Pack each room leaving the boxes stacked and labelled with the room they are to be moved to i.e. kitchen.  It is a good idea to write on each box a list of its general content

Boxes containing breakables label ‘FRAGILE’ and identify these items to your removal people

Pot and pack away plants and cuttings you are taking with you

Explain your packing procedure to the removal people and be at your new home when they arrive

Don’t

Put breakables or liquid filled containers in drawers

Overload drawers and make furniture too heavy to shift (too much weight can damage furniture)

Move netting, barbed wire, timber, wood, coal etc, without special arrangements being made

Store perishable goods where they might be overlooked

Moving guide

truly is a completely appropriate nickname for this beautiful territory. With a captivating landscape, great economic opportunities, and welcoming people, it’s easy to see why moving could be on one’s mind. If you are considering moving to one of the fastest-growing states in the United States, then you came to the right place

Has the decision about relocating been finalized? Great! We certainly believe you have made the right decision. However, you need to be ready for the dozens of tasks that need to be done before the big day arrives. One of the most important pieces of advice we can give you is to never procrastinate when it comes to your residential relocation

Find a perfect match

It goes without saying that you can attempt to move in the DIY style. After all, you wouldn’t be the first person to do so. But every relocation, be it local, long-distance or interstate one, stands the best chance of success with some professional help. The good news is that these days, there are hundreds of moving companies competing in the same area. So if you are looking for a moving company in Idaho, all you have to do is dig deep.

Make a moving checklist

From shopping for packing supplies to packing your boxes and everything in between, you can rest assured that your relocation is going to be a process accompanied by different tasks. As the moving day gets closer, it will be much easier to forget about a crucial obligation, such as switching your utilities. To avoid getting sidetracked and losing sight of what’s important, you should sit down with a pen and paper and create a moving checklist.

Always declutter before moving

The circumstances of your relocation don’t matter. Nothing can change the fact that decluttering should always be a mandatory part of any relocation process. Not only will you be able to move with a lighter load, but you will also be able to significantly cut your moving costs. Many moving companies charge based on the weight of the cargo you are transporting, so it only makes sense that fewer items will equal a lower relocation price. So set apart a couple of days for this process and make sure you bring only the essentials with you. That will be a perfect way to start your new life, don’t you think?

Guide to finding affordable movers

Every moving company can claim to be affordable. But not everyone will be able to provide the same quality of service as us. When you book Good Movers, what you invest in your move is justified by what you get in return.

you need to start your search on time. The longer you wait, the less likely you are to have time to conduct proper research. Start early and you will easily spot the best moving services

Rely on former customers to help you find affordable movers

Ask around. Gather recommendations from your closest people. Your friends, neighbors, colleagues and family members might know some affordable local movers But always ask about their overall impression, not only the moving costs. Remember that low-quality service can come as expensive as an unfortunate moving scam. If they don’t know any affordable movers

Book the most affordable movers

Make a list of around five moving companies you reckon you can trust. Then visit their websites, along with their social media accounts. If they do not have a website, it is the first red flag! Same, websites that have very little information are shady by all standards. The basic information a site should share is their contact information, including an email address, a phone number, including a physical address! Furthermore, you should read thoroughly about the moving services they provide and even ask them personally. Now that you know if your top choices have an informative website, offer the services you need, and you can customize your relocation to fit your budget, you are one step closer to finding the perfect affordable movers

Check if your movers are legal

As tempting as they are, low prices and good service are not the only factors you ought to take into consideration. Before making the final pick, you should check whether your short-listed affordable movers No matter how cheap a moving company is, they are never a good choice if they are not licensed and insured.

HOW MUCH DO I TIP MOVERS?

Let’s face it, moving is stressful, but isn’t that one of the reasons why you hired movers? Most people realize just how difficult moving is, notably the physical aspect, once the movers have arrived and begun to load or unload. It’s no wonder that one of the most common questions we receive is, “How much should I tip the movers?”

SHOULD I TIP MY MOVERS?

First, we want to make it clear that tipping is not required; but as with most services tipping is a way for the customer to express their thanks for a job well done. While there is no “average tip”, it is widely accepted that tipping amounts for movers range from 5% of the total bill to $20 per man. Proper etiquette is to tip each mover individually, not to the foreman or supervisor. This shows that you recognize and appreciate their individual efforts. If you feel that one or two movers worked especially hard, or are more deserving than the others, then feel free to tip that mover a little extra. If the crew has gone above and beyond your expectations, you may certainly match their efforts with a larger tip amount

Common “above and beyond” situations include:

Completing the move in a shorter amount of time than originally estimated.

Fitting all of your items into the moving truck or POD even though it once looked impossible.

Moving large quantities of heavy, bulky or awkward furniture. Especially when the movement includes stairs, long walks or other obstacles.

Excessive stairs, notably 3rd floor apartments and above.

ALTERNATIVES TO TIPPING WITH CASH

Short on cash? There are plenty of other ways to show your appreciation aside from cash.

Since moving is a tough, labor-intensive service, cold drinks such as bottled water or Gatorade are a great way to show your appreciation while also showing your concern for their well-being.

Provide the crew with lunch in lieu of a tip.

If you are planning to throw away old furniture ask the crew if they would like it instead. This saves you time and money and doesn’t impact the environment.

A GUIDE FOR LOCAL AUTHORITIES

the Living Wage Foundation, which aims to help local authorities become accredited Living Wage employers

The guide explains:

why moving to the Living Wage can help local authorities tackle low pay and child poverty in the community

how the accreditation process works

what the benefits of accreditation are

how local authorities can champion the Living Wage locally.

With stagnating wages and high inflation forecast, the introduction of universal credit and the four-year freeze on working-age benefits, families across London need all the help they can get. Becoming an accredited Living Wage employer can improve the lives of those who live and work

The guide also aims to help local authorities that are already accredited go even further as Living Wage employers. It includes top tips, local authority case studies and best practice advice for encouraging take-up of the Living Wage among local employers.

Important Factors To Look For When Selecting Divorce Lawyer

How To Choose A Divorce Lawyer

So you need to choose a divorce lawyer, but don’t know how to get started. Before you hire the first lawyer listed in the yellow pages, take some time to figure out what you want from an attorney and how you want your case to be handled.

Advice to Help You Decide on a Divorce Lawyer

It can feel intimidating to talk to a lawyer. I’ve learned the hard way that if your lawyer can’t explain things to you as if you are a smart 14-year-old, you should find a lawyer who can. A lawyer is supposed to make your life easier, not more stressful.

Your first step in your quest to choose a divorce lawyer is to ask your family, friends or acquaintances. Ask why they like him or her and what the lawyer did for them. If you’re consulting a lawyer about a divorce or estate planning, it’s important that he/she has experience in these areas of expertise.

Credentials count, but this is about more than education and experience. The law is complicated enough; you need someone who can explain things to you in addition to being qualified to advise you.

In the event of divorce, you will be working closely with the lawyer. You want things explained clearly to you because you’ll be emotionally upset. A lawyer’s jargon and lack of ability to communicate clearly will upset you even more.

Before you choose a divorce lawyer, phone the office to ask if the lawyer will give you an introductory meeting at no cost. This allows you both to get a sense of whether you can work well together.

For example, I couldn’t work with a lawyer who is patronizing. I need someone to give me information, explain all the options, show me the pitfalls, and outline the costs. Many lawyers think that reassuring and protecting a woman is doing her a favor. I call that the ‘Don’t worry about a thing, dear’ attitude that keeps women from being able to make decisions. On the other hand, many women just want their lawyer to take care of everything. I’m not one of them.

How to Interview a Divorce Lawyer: The Right Questions to Ask

Filing for divorce or being served with divorce papers is perhaps one of the most daunting experiences spouses can ever go through. For the average person, this is usually a very confusing and troubling moment as they suddenly find themselves in unknown territory with no idea on how to proceed. While some may immediately get recommendations from friends and family on what to do next, the case is usually very different for others. Whatever end of this table you find yourself at, one thing is certain: you need a divorce lawyer.

Hiring a divorce lawyer comes with its own complications and requires a great deal of care and meticulousness from all parties involved. A great deal of your personal life and space will be shared so it’s vital that you make the right decisions from the onset. Although this may not always be a straightforward process, preparing well in advance should ideally help you make well informed decisions, especially as it relates to hiring the right lawyer for the job.

when you’re preparing to take that all important step of interviewing a divorce lawyer.

1. Get Recommendations

This should ideally be one of the first moves you make as you search for a lawyer to represent you. Get in touch with a family member or friend who has gone through a divorce and speak with them to ascertain whether their lawyer or even their spouse’s may be right for you. While this is a great starting point, it’s even more important to get a personal feel of a potential lawyer via an interview, so don’t think you’re finished just because your friend loved her lawyer. What works great for someone may not work for you, and vice versa.

2. Do your investigation

Once you’ve narrowed down your list of potential divorce lawyers to hire, you’ll need to carry out a personal investigation about them and eventually carry out an initial consultation. Look them up online and find out as much as you can before putting a call across to them.  When you eventually call the lawyer, try to observe their approach towards you. Do they listen? Are they in a hurry to offer you solutions or do they take their time to hear you out? If you’re satisfied with how the initial consultation went, you may go ahead and book a date for the interview or face to face discussions.

3. Prepare yourself for the interview

You should ideally prepare all relevant information pertaining to your divorce proceedings before meeting with any potential lawyer. Details regarding your personal assets, possible custody arrangements, and any other information you consider important should be readily available during the consultation. This information will enable the divorce lawyer to make informed decisions when providing you with advice. You do not necessarily need to provide copies of documents at this stage unless you decide to retain the lawyer.

4. Be Open

Hiding any critical information regarding your divorce may hinder the lawyer’s ability to critically assess your situation and offer the appropriate advice. At this point, be honest and open during the consultation. Share all the key details surrounding the divorce even if you do not feel they are relevant. You may have to reveal intimate and personal details regarding your relationship with your spouse but do not worry as this is perfectly normal and appropriate.

Informing the lawyer about any information that could potentially harm your divorce case in court puts them in a better position to advise and represent you. It’s worth noting that whatever discussions you have with the Lawyer even during consultation are confidential so ensure you provide complete and accurate information.

5. Consider the Fees

During the consultation, find out what fees you will be expected to pay for their service. Is there a fixed price or hourly price for representation? Is there a minimum charge if they bill you hourly? These are some of the questions you should ask regarding what you’ll be expected to pay. You should also find out about a breakdown of what exactly you’ll be charged for to avoid any surprises.

The Most Important Questions To Ask A Divorce Attorney

Selecting a divorce attorney can seem intimidating, overwhelming or even confusing. Preparing yourself before your initial consultation can not only help alleviate these feelings, but can assist you in reviewing and determining which divorce attorney is right for you. The following questions are suggested:

Questions To Ask Your Divorce Attorney

  • How do you work with clients and what is your overall style or method to handling divorce?
  • Will you be handling my case yourself? Or will another attorney in your office handle it? If another attorney, ask to speak to that person directly.
  • How much experience do you have handling divorces like mine?
  • Can you give me an overview of the steps we’ll need to take to proceed with my divorce?
  • How long will the divorce process take?

Questions About Experience

The issues that need to be addressed in your divorce are ones that will affect you and your family for years to come. When asking your divorce interview questions, it is important to learn whether your family law attorney has the experience necessary to advise you correctly.

Questions to ask your divorce attorney might include:

  • What proportion of your cases involve family law?
  • How long have you been practicing family law?
  • How many family cases have you handled?
  • How much of my case will be handled by other attorneys or staff and what is their experience?

I’ve Been Living With My Partner For Two Years. Does That Mean I’m Entitled To Half Of The Property Pool?

Not necessarily. Two years is more of a “rule of thumb” rather than a rule of law. According to the section 2F of Acts Interpretation Act, when considering whether an unmarried couple is in a de-facto relationship.

Various factors are considered, such as:

  • The duration of the relationship;
  • The nature and extent of their common residence;
  • Whether a sexual relationship exists;
  • The degree of financial dependence or interdependence, and any arrangements for financial support, between them;
  • The ownership, use and acquisition of their property;
  • The degree of mutual commitment to a shared life;
  • The care and support of children; and
  • The reputation and public aspects of the relationship.

Therefore, a relationship is ‘de facto’ if, on balance, enough of these indicators are present. The balance of indicators should show that there is a relationship of significant commitment.

Posted inLegal

Electrical Home Inspections A Question And Answer Guide

Complete Guide to Home Electrical Safety Inspections

In the home, there are a lot of systems that need to work properly in order for you and your family to be comfortable. One of them is your electrical system. Electricity lets you keep the lights on, use appliances, and go on with your day-to-day life, so it has to remain fully functioning and safe at all times.

Electrical safety inspections ensure that your Sacramento area home’s electrical wiring and other components are working properly, which keeps your home safe from electrical hazards. Learn more about what home electrical inspections are below.

What is a Home Electrical Inspection?

A home electrical inspection is when a qualified electrician examines the entire electrical system of the home. They are checking to make sure everything is compliant with home safety standards. Electricians use the National Electrical Code, the minimum standards for safe electrical wiring, to examine the home. These standards exist across the U.S

The goal of the home electrical inspection is to check that your electrical system complies with current government regulations and meets the most up-to-date safety standards. Among other things, the electrician aims to identify safety issues. Electricians usually start with the electrical panel, as that is the heart  of the home’s electrical system , and then move out to properly examine the rest of the home.

A home inspection typically includes some or all of the following:

Evaluate the electrical panel’s age and condition

Check wiring for uncovered, exposed, or outdated wires

Assess electrical equipment to see if it is outdated or degraded

Examine and test safety switches

Look for non-compliant electrical components

Locate and test smoke alarms and CO-2  to ensure they meet standards

Check for DIY wiring, splicing, and extensions to ensure proper connections

Inspect light switches and fixtures

Assess wall outlets to make sure they are safe and grounded

Search for any other electrical hazards

Electrical Inspection Checklists

The checklists are intended to help inspectors keep track of the numerous aspects of an electrical installation that must be checked, verified, reviewed, determined, or otherwise examined for NEC compliance.

The checklists are also intended to serve as an organizational tool for contractors, project managers, or anyone who conducts, receives, or is responsible for electrical inspections, or who may wish to perform self-inspections, of electrical installations.

The checklists are organized as follows:

Introduction

Checklist 1-1: General Safety Checklist for Electrical Inspections

General Requirements Inspections

Checklist 2-1: General Requirements for Electrical Inspections

Wiring Methods and Devices

Checklist 3-1: General Wiring Methods

Checklist 3-2: Boxes and Conduit Bodies

Checklist 3-3: Cabinets and Cutout Boxes

Checklist 3-4: Switches and Receptacles

Services, Feeders, and Branch Circuits

Checklist 4-1: Services

Checklist 4-2: Feeders

Checklist 4-3: Branch Circuits

Grounding and Bonding

Checklist 5-1: Service Grounding and Bonding

Checklist 5-2: Equipment Grounding and Bonding

Dwelling Units and Mobile/Manufactured Home Sites

Checklist 6-1: Residential Rough Inspection: General Requirements (All Areas)

Checklist 6-2: Residential Rough Inspection: Kitchen

Checklist 6-3: Residential Rough Inspection: Dining Room

Checklist 6-4: Residential Rough Inspection: Bathrooms

Checklist 6-5: Residential Rough Inspection: Other Habitable Rooms (Bedrooms, Family Rooms, Parlors etc.)

Checklist 6-6: Residential Rough Inspection: Hallways and Foyers

Checklist 6-7: Residential Rough Inspection: Stairways

Checklist 6-8: Residential Rough Inspection: Closets

Checklist 6-9: Residential Rough Inspection: Laundry Area

Checklist 6-10: Residential Rough Inspection: Basements and Attics

Checklist 6-11: Residential Rough Inspection: Attached Garages and Detached Garages or Accessory…

Checklist 6-12: Residential Rough Inspection: Outdoors

Checklist 6-13: Residential Rough Inspection: Services and Feeders and System Grounding

Checklist 6-14: Residential Rough Inspection: Feeders and Panelboards

Checklist 6-15: Residential Finish Inspection: General Requirements (All Areas)

Checklist 6-16: Residential Finish Inspection: Kitchen

Checklist 6-17: Residential Finish Inspection: Dining Room

Checklist 6-18: Residential Finish Inspection: Bathrooms

Checklist 6-19: Residential Finish Inspection: Other Habitable Rooms (Bedrooms, Family Rooms, Parlors etc.)

Checklist 6-20: Residential Finish Inspection: Hallways and Foyers

Checklist 6-21: Residential Finish Inspection: Stairways

Checklist 6-22: Residential Finish Inspection: Closets

Checklist 6-23: Residential Finish Inspection: Laundry Area

Checklist 6-24: Residential Finish Inspection: Basements and Attics

Checklist 6-25: Residential Finish Inspection: Attached Garages and Detached Garages or Accessory…

Checklist 6-26: Residential Finish Inspection: Outdoors

Checklist 6-27: Residential Finish Inspection: Service Equipment, Feeders, and Panelboards

Checklist 6-28: Residential Finish Inspection: Mobile/Manufactured Home Site Inspections

RESIDENTIAL ELECTRICAL INSPECTION

Home inspectors working in the demanding and fast-paced real estate market need tools to help them analyze a residential electrical system and provide homeowners and buyers with an accurate and thorough inspection of these systems. Residential fires caused by faulty wiring are a critical issue and home inspectors need to avoid missing electrical problems and be faced with legal action.

For the home inspector faced with this challenge, this book examines critical issues in residential home inspections with over 150 supporting photos and diagrams. Electrical theory and basic electrical calculations are introduced with review sections, exercises, and comprehensive checklists.

will provide you with the tools you need to deliver an authoritative electrical inspection report and build your own home inspection business.

Electrical System

The inspector shall:

inspect:

service drop.

service entrance conductors, cables, and raceways.

service equipment and main disconnects.

service grounding.

interior components of service panels and subpanels.

conductors.

overcurrent protection devices.

a representative number of installed lighting fixtures, switches, and receptacles.

ground fault circuit interrupters and arc fault circuit interrupters.

describe:

amperage rating of the service.

location of main disconnect(s) and subpanels.

presence or absence of smoke alarms and carbon monoxide alarms.

the predominant branch circuit wiring method.

The inspector is NOT required to:

inspect:

remote control devices.

or test smoke and carbon monoxide alarms, security systems, and other signaling and warning devices.

low voltage wiring systems and components.

ancillary wiring systems and components not a part of the primary electrical power distribution system.

solar, geothermal, wind, and other renewable energy systems.

measure amperage, voltage, and impedance.

determine the age and type of smoke alarms and carbon monoxide alarms

Licensed Electrical Inspectors (LEIs)

This licence may be issued to experienced electrical licence holders, or a person with an equivalent qualification or experience, who wishes to undertake work inspecting electrical installations for safety or compliance with regulatory requirements.

Applicants must provide evidence demonstrating they have the qualifications, experience, competency and proficiency for the class of licence required, as detailed below.

Assessments

G licence

All applicants for the Class G licence must complete three assessments: G Class Theory, G Class Practical and Safe Approach.

Read the LEI assessment information.

All Class G assessments are conducted by Future Energy Skills.

H, M and V licence classes

Applicants for the specialist Licence classes H, M and V do not require formal assessment, but applicants must demonstrate on-the-job training and competence. See below for further information on the individual classes of licence.

Applicants must produce evidence demonstrating they have the qualifications, experience, competency and proficiency for the relevant class of licence required. To apply for a licence, create a user profile in Connect and lodge your application from there.

Class G

Class G allows an inspector to undertake inspections of any low voltage installations, except for those required under Class H, Class M and electric fences intended primarily for the control and containment of animals.

After Completion Of Home Inspection Training

HOME INSPECTION GUIDE

Protecting Your Home from Fire Hazards

3 STEPS TO A FIRE SAFE HOME!

BE AWARE OF THE COMMON CAUSES OF HOME FIRES.

INVOLVE THE WHOLE FAMILY AND CHECK FOR HOME HOT SPOTS.

KNOW HOW TO CORRECT HOME FIRE HAZARDS QUICKLY AND SAFELY.

ELECTRICAL

Never overload your homes electrical system. All large appliances should have their own circuits.

Signs of overloaded wiring include:

Frequently blown fuses or tripped circuit breakers.

Slow heating appliances.

Shrinking television picture.

Never replace a blown fuse with a fuse that is too large for that circuit. Never substitute a penny for a fuse.

If you suspect your homes wiring is overloaded, have it checked by a licensed electrician immediately.

Always unplug appliances after use.

Never wrap a cord around a warm appliance.

Don’t block air circulation.

Never leave an electrical appliance near water.

If an appliance gets wet, have it serviced before using it again.

Replace broken plugs and frayed or worn cords immediately.

Only plug one appliance into an outlet or extension cord.

HEATING

Home heating systems cause many fire related deaths each year. Being aware of some of the problems that heating systems can cause can help to decrease the occurrence of these fires.

Gas Heaters

Examine the gas line for punctures or splits.

Check the connectors and valves for leaks.

Inspect monthly during the year and weekly during the winter.

Electrical Heaters

Make sure your homes wiring is sufficient to handle the heater’s needs.

Frequently check wires and fuses for damage and repair immediately.

Never use the heater near a source of water.

Kerosene Heaters

Use only water clear, grade A-1 kerosene.

Never use gasoline, camp stove fuel or yellow kerosene.

Always keep all combustible materials at least three feet away from space heaters.

Only use if legal in your area.

Woodstoves and Fireplaces

Top the chimney with a spark guard.

Always use a screen large enough to cover the opening.

When in use, keep the damper open.

Never burn green wood, paper or trash, they cause heavy creosote build-up.

Inspect and clean regularly.

HOUSEKEEPING

Your Home and its Surroundings

Avoid cluttering the attic or basement. Make sure there is air circulation.

Store flammable liquids in tightly sealed, properly labeled metal containers away from heat sources.

Clear pine needles and leaves from the roof and gutters. Trim tree limbs within ten feet or your house and remove dead limbs.

Never keep trash near your home.

Never smoke in bed. Keep smoking materials away from the bed area.

Check living areas for smoldering cigarettes.

Keep matches and lighters out of the reach of children.

In the Kitchen

Don’t overheat grease and be alert for overflows.

Never leave cooking unattended.

Always turn pot handles toward the center of the stove.

Don’t leave towels, napkins, or pot holders near the stove.

Keep your stove and oven clean.

INSPECTION CHECKLIST

Install smoke detectors throughout your home and test them at least once a month.

Keep multipurpose ABC fire extinguishers serviced and ready to use. Know how to operate them properly.

Keep emergency numbers clearly posted near the telephone, and learn the correct procedure to report a fire.

Make sure every family member knows how to escape from the house by crawling low in smoke. Hold regular fire drills.

Designate two exits from each room and a meeting place outside the home.

If a fire breaks out and you can’t control it, get out fast and call the fire department from a neighbors home.

NEVER GO BACK INTO A BURNING BUILDING!

Fall Inspection Guide

carries a flashlight into the attic of the three-story house, but he doesn’t need it. Daylight streams in through several coin-size holes in the roof, and the rays of sunlight pierce the musty space like in an old-master painting. “Looks like it’s been leaking for a while,”

there was no house inspector to look over the property. ­Didn’t need it; they were the first owners. But that was a long time ago, and since then, this place has missed more than a few checkups and a lot of preventive medicine. The crew is getting ready for the start of construction by doing an informal version of what a professional inspector does when a property changes hands. But had someone been giving the house this kind of attention on a regular basis, many of its current problems could have been kept at bay.

Since inspectors always seem to find something wrong, it stands to reason that any homeowner who uses their kind of thorough thinking as a model during a once-a-year maintenance review—preferably in the fall, before rough weather sets in, and with a notepad in hand—will catch small problems before they balloon into major expenses. You don’t need to hire a pro, though it may be warranted under certain circumstances

The logical place to start any fall maintenance inspection and repair list is outside, where you can take in the big picture. that means doing something as simple as standing and looking at the house. Conspicuous changes from year to year, like cockeyed windows or a sway in the roof, indicate an ongoing prob­lem, such as a compromised foundation that’s pulling the house down.

But you also need to look at the parts that make up the whole: chimney, roofing, flashing, siding. Take note if anything is broken, cracked, curled, split, or crooked. But also pay attention to less overt signs: stains on siding that could mean water isn’t flowing through the gutters and downspouts, peeling paint or missing mortar in distressed spots, small holes or droppings near animal or insect nests. Be especially conscious of the presence of vermin, because they chew on framing and wiring.

The hottest summer home inspection checklist for homebuyers or sellers

Now more than ever, it’s important to ensure your clients are prepared to look for possible issues that might affect their home’s sale or their purchase of a new home.

Home Inspectors to guide a DIY home inspection. Feel free to share with your clients as a checklist when buying or selling a home.

Air conditioner

Inspect the unit to make sure it’s in good working condition.

The air conditioner must be leveled and free from obstruction.

Do not fully cover your air conditioning unit during the winter — doing so will cause the fins to rust inside. Instead, consider covering it with a piece of plywood and securing it with a rock.

Deck

Maintain your deck by ensuring it’s stained or painted on a regular basis.

Check the overall structure every spring and fall.

Ensure there are proper footings to prevent sinking

Proper guardrails should be at least 36 inches to 42 inches tall.

Rodents and pest prevention

Check for common rodent entry points, including open gaps in the exterior.

Another common entry point is where the air conditioner lines enter the house.

Gutters

Check for clogs and clear the gutters. If you find any damage left over from the harsh months, get it fixed to eliminate the possibility of developing water damage.

Also, while you’re up by the roof, it’s worth doing a survey to see if there are any missing shingles or other types of damage.

THE HOME INSPECTION PROCESS: A GUIDE FOR SELLERS AND BUYERS

home inspectors is provided as a courtesy only. We do not endorse or support anyone specifically nor do we know their experience level. We suggest you do your own investigation and study of reviews before you choose your home inspector.

The home inspection is a crucial part of any home sale and purchase transaction, and for good reason. The buyer needs to know that he’s not buying a potential money pit, and that there are no unsafe structures at the property before he hands over the purchase money. For the seller, understanding the home inspection process is an opportunity to fix anything that could scupper the deal and secure a top-dollar sale price. So what happens at this mysterious inspection, and what can you do if it throws up a red flag?

Let the Buyer Beware!

The legal framework for buying and selling real estate comes common law, which operates under the doctrine of caveat emptor: let the buyer beware. Caveat emptor means that the buyer has a duty to investigate the property before closing. The seller, on the whole, does not have to disclose any information about the property he is selling, good or bad.

Of course, this is a simplistic view and state law has intervened over the years to water down the caveat emptor doctrine. Today, most sellers make disclosures about the property, such as whether the home has flooded in the past and when the furnace was last serviced. Federal law also requires mandatory disclosure about health-harming substances such as mold and lead paint.

The problem with disclosures is that a seller only has to disclose problems that he actually knows about. Sellers do not have to poke around the roof or go deep into the foundations to uncover any problems with the property. Many sellers will not spot problems, especially those that are invisible to the untrained eye. That’s why 84% of home buyers hire a professional home inspector to put the property under the microscope.

Home Inspection: Seller’s Guide To Getting Your Home Inspection-Ready

As you prepare to sell your home, you want your home inspection to go well and prevent any surprises on the day of your inspection. There are several ways to avoid potential nightmares such as expensive closing costs, additional renovations or even a withdrawn offer. Read on for tips on how to prepare your home and what to expect out of an inspection.

The First Step To Getting Your Home Ready

The first thing you’ll do when preparing your home for an inspection is to clean it. Your clean home will show the inspector that your home is well-maintained and cared for. It will set the expectation that the appliances and other elements that will be inspected are in equally good shape.

As you tidy up, you’ll want to make sure all the appliances are easily accessible for your inspector. This may mean moving some furniture or clearing a path to utilities such as water heaters. Inspectors aren’t required to move your belongings, so make sure there’s enough room to access various appliances and utilities that there’s no need to have to reschedule. Rescheduling will cost you and the buyer more time and money.

The major things your inspector will look at are:

Physical Structures: This includes checking the driveway, garage floor, roofing, attic spaces and foundations for any major issues.

Interior Structures: In addition to the home’s physical structures, an inspector will look inside the home to assess the condition of the living spaces. They’ll look at the flooring, walls, doors and windows.

Major Systems: Your inspector will also perform running tests on the water systems in the home. In this procedure, they’ll turn on every faucet to test water flow, cold water output and hot water output. They’ll also test the refrigerator, dishwasher, oven, stove and all the toilets for basic functionality and performance.

Utilities: As part of the major systems check, your home inspector will assess and give you a detailed report on the quality of electrical lines in your home as well as your gas service.

Get The Most Out Of A Home Inspection With These Tips

Beyond being aware of what will be inspected and making sure that you present your home well, there’s more you can do to get the most out of your home inspection. Here are 10 steps for you to follow to ensure a smooth inspection process:

Turn it on: Confirm that all of your services are turned on. This includes your water, electric and gas services. You may need to make phone calls to these providers to ensure that they’re up and running before the inspection. When your gas service is on, ensure that the pilot light is lit.

Pets: Ensure that your pets won’t hinder the inspection. Some inspectors will ask that pets be removed from the home while they’re there. You may want to plan to have your pets secured outside or off the property during the inspection.

Everything works: You may also want to replace burned-out lightbulbs to avoid a “light is inoperable” report that suggests an electrical problem. You should ensure that any electrical outlets are in working order as well.

Working detectors: Replace any batteries in smoke detectors or carbon monoxide detectors and make sure they work. Most smoke and carbon monoxide testers have a “test” button to help you know they’re functioning properly.

Air Filters: Ensure that all heating, ventilation and air conditioning (HVAC) air filters are clean and fit in their compartments properly. You may want to replace your filters before your home inspection.

Pests: Avoid any red flags for bugs on your home inspection such as moving stored items, debris and wood from the foundation of your home as they’re a breeding ground for termites. If you’ve had pest issues in the past, you may want to have an exterminator look at your house before the inspector comes to make sure you don’t have any existing issues with pests.

Utility access: Ensure that the inspector will have access to everything they need to assess. This includes the HVAC equipment, electrical service panels, water heaters, attics, crawlspaces and any other appliances in your home.

Room access: Unlock any areas that your inspector needs to access. This includes the attic door or hatch, electrical service panels, the basement and any other doors or exterior gates. You’ll want the inspector to be able to access every area of your home.

Lawn hazards: If you have trees in your yard, make sure that any limbs are at least 10 feet away from the roof. You may want to trim your shrubs and check that they’re not too close to your house. You’ll also want to remove any foliage that’s growing too close to the exterior because some foliage can hide pests or hold moisture against the exterior of your home. If necessary, hire a professional to remove any overgrowth in your lawn.

Repair and replace: You’ll want your home to look well-maintained. Repair or replace any broken or missing items. This may include doorknobs, fixtures, locks and latches on doors, windowpanes or window screens. On the outside of your home this may include gutters, downspouts and chimney caps.

A typical home inspection lasts about 3 hours. Oftentimes, the home buyer will attend the home inspection as it’s likely the first time they’ll be seeing the home since putting in an offer and potentially the last time before their final walkthrough. Having the homeowner present during this inspection can be uncomfortable for not only your potential new buyer, but for the inspector as well. Our advice is to schedule the inspection at a time when you’ll be out of the house. This will help make your buyer feel comfortable and more at home.

The Facts About The Newly Instated Tax Preparation Certification

How Tax Preparers Can Make Money Year-Round

If you’re just beginning to look into a career as a tax professional, you may only be familiar with part of what tax preparers do – filing returns for individuals in tax season – leaving you with questions about how tax professionals make a living the rest of the year. Do tax preparers work year round? How do tax preparers earn money in the off-season?

The answers will vary with each individual tax preparer, but rest assured tax preparers can and do make a living year round. Most do perform some kind of work outside of tax season, and many diversify their income by offering other services in addition to tax preparation. Whether you’re just starting out or you’re a veteran tax professional, here are eight ways tax preparers can make money year round.

Prepare taxes for businesses

One of the simplest paths to year-round income as a tax professional is to offer tax preparation services to small businesses. Unlike individual tax filers, businesses need year round tax services. Many of your current clients may own small businesses themselves, so reach out to let them know about your new services.

If you want more training on preparing taxes for businesses, some IRS-approved CE providers like the Latino Tax Professionals Association (LTPA) offer courses on small business taxes.

Offer payroll management

If you already serve small businesses, you know that many need more than just tax help. Payroll is a task many small business owners are looking to outsource. Auxiliary services like this are a win-win for building your business: your small business clients are likely to hire you if they need payroll help and vice versa.

Perform bookkeeping services

Like payroll services, bookkeeping services are in high demand among small businesses. Despite what you may have heard, you don’t need an accounting degree or accounting experience to be an excellent bookkeeper. While the two services have similarities, bookkeeping is different from accounting and has a much shorter learning curve.

The LTPA also offers courses in bookkeeping and payroll for small businesses, making it easy to confidently offer these services to your business clients.

Become a tax service bureau

As a tax service bureau, you’ll help other tax professionals find the ideal tax software for their practice, and no – you don’t need to be a tech guru and develop your own tax software. Service bureaus resell trusted tax software under their own company logo, boosting the credibility of their brand and diversifying their income sources.

Who needs a PTIN?

A PTIN is required for anyone who prepares federal tax returns. It is also required for reporting agents who give tax advice and Enrolled Agents.

A PTIN is not required for:

  • Attorneys, certified public accountants, and Enrolled Retirement plan Agents do not usually need to obtain a PTIN unless they are compensated to prepare all or substantially all of a federal tax return or claim for refund.
  • VITA site preparers

Remember that the PTIN must be used as the identifying number on returns prepared. Failure to obtain and use a valid PTIN to file returns may result in section 6695 penalties and/or disciplinary action from the Office of Professional Responsibility.

How do I apply for the first time?

Prepare to begin your PTIN application by gathering the following information:

  • Personal information (name, mailing address)
  • Business information (name, mailing address)
  • Explanations for any felony convictions
  • Explanations for any problems with your U.S. individual or business tax obligations
  • Any applicable U.S.-based professional certification information (CPA, attorney, enrolled agent, enrolled retirement plan agent, enrolled actuary, certified acceptance agent, or state license) including certification number, jurisdiction of issuance, and expiration date

Employer and Small Business Tax Filing for Your Tax Prep Business

As a tax preparer, you’re already well-versed in the tax laws that affect small business owners. This article is meant to serve as a guide to ensure you are compliant in your own business. From choosing a legal structure to collecting tax info for your employees, these four steps will help you follow federal and state tax regulations as a professional and as an employer. 

Choose your business structure

The way you decide to structure your business is up to you, but it will determine which income tax return you need to file. Many tax preparers find that an LLC or a DBA (Doing Business As) works fine. 

Depending on the structure and where you are located, you may also be required to register with your state, and you will likely be required to have a business license. In fact, a business license is commonly required in most states, cities, and/or counties. 

For example, in Georgia, an LLC has an annual registration that must be filed with the State of Georgia. The LLC must also obtain a business license from Augusta-Richmond County. If the LLC was engaging in certain additional business activities, it might also have to obtain a license from Georgia to operate that supplementary business.

Choose your tax year

The calendar year begins January 1 and ends December 31. A fiscal year lasts 12 consecutive months and can end on the last day of any month (other than December). When it comes to reporting your own business income and expenses, you’ll need to decide what annual accounting period you will use.

Apply for an employer tax number (EIN)

If you employ a staff, you’ll need to obtain an Employer Identification Number from the IRS (Not to be confused with an EFIN). In addition, make sure that each team member completes a Form I-9, Employment Eligibility Verification, as well as a Form W-4, Employee’s Withholding Allowance Certificate. 

How can a tax preparer implement non-technical identity data management procedures?

Knowing what cybercriminals are looking for makes it easier to safeguard that valuable information and protect your business. Here are a handful of non-technical approaches that will enable your tax prep business to better shield identity data: 

Understand that not all data needs to be saved

Protect your customers by getting rid of some information. After all, it can’t be stolen if you don’t have it. Retain the records that are required by law and the contact info needed to maintain a relationship with a client and nothing more. Delete all client identity data after three years.

Train your staff to be skeptical

Phishing and social engineering scams are used by hackers to fool employees into sharing personal or financial information. Email is the primary tool that hackers use to deliver scams to unsuspecting recipients, so this is where you want to be on the lookout. Train your staff to identify suspicious emails. As a general rule, be wary of all messages from unknown senders and never share information, click links, or download attachments from anyone that you don’t know. This can be difficult for tax preparers who receive attachments from clients, but it is important to remain vigilant and on the lookout for anything suspicious. Use a secure document sharing tool like TaxSlayer Pro’s TaxesToGo app or client portal when sharing documents with clients to avoid being tempted to download attachments from emails.

Silo your data based on who needs it most

Not every member of your team needs access to identity data. Segment access based on a need-to-know basis. Fewer access points to sensitive data offer fewer opportunities for a hacker to weasel in and cause problems.

Five Ways Your Tax Preparer Knows You’re Lying

Divorce-Related Fraud

Claiming dependents unjustly isn’t the only way that divorcees can fudge their numbers.

Although child support is nondeductible for payers,1 some filers will still try to claim this expense by stating that it is spousal support or alimony in hopes that the IRS won’t notice the discrepancy and will allow the deduction. If they cannot produce a divorce decree that shows that the payment is alimony, then they shouldn’t be deducting it on any return.

Income Fraud

Filers who fail to report income can not only lower their tax bill but also collect unemployment benefits. Those who report abnormally low income for the year will trigger a red flag, especially if they are claiming dependents. In some cases, they are receiving child support or state and/or federal assistance that is nontaxable, but many of these filers also worked jobs for which they were paid in cash. This type of income is especially tempting to omit because of the additional payroll tax.

Personal Vs. Business Expenses

Breaking down business versus personal use for things such as vehicles and office equipment can be a very gray area for some customers. Customers who increase these amounts or percentages towards business use several times tend to arouse my suspicion unless they can cite specific additional instances of use.

More creative cheaters might create a dummy business entity to which false expenses are attributed.

Overseas Investors

Some clients think that investment or other income that they earn in other countries can be left off their tax return. This is not the case if they are U.S. citizens.

Any customer that gives me information about what they did during their time away, if they resided in another country for any material period, but have no income from there, that information should be closely questioned and thoroughly documented.

If the IRS Catches You

Of course, the rules clearly state that if a tax filer knowingly enters fraudulent information on a tax return that they prepare for a client and submit it, then both the client and the filer will be subject to disciplinary action or even criminal penalties (if the IRS discovers it). The client will also be subject to interest and penalties on the amount of tax that should have been paid.

Customers should be informed that adding substantial deductions to the return may increase the chance that they will be selected for an audit. If an audit happens, then the IRS will disallow any deduction or other incentives for which there is no proof, even if it was a legitimate expenditure that was actually paid.

Importance Of Proper Eye Care

Different Types of Visions

Everyone has different vision types according to one’s health and living style. Some visual conditions of every patient can same but vision types can different. Here, we are describing different vision types so that you can understand them.

1. 20/20 vision:

20/20 vision is used to define a certain level of visual acuity. It is related to sharpness and precision of vision. 20/20 vision means you can see clearly the object at the distance of 20 feet. It does not mean you have a perfect vision. It means you can see clearly at some specific distance. There are many other essential eye condition that is not related to visual acuity. You can take help of RX Safety Glasses to see things clearly at distant places.

2. 20/100 vision:

20/100 vision is very rare. In this vision, a person can see clearly at a distance of 100 feet. He/she can see as clear as a person of normal 20/20 vision can see at 20 feet.

3. 20/10 vision:

In this vision, a person is above average. 20/10 vision person is better than normal standard vision’s person. A person can see easily at a distance of 20 feet away. A normal person can see clearly at 10 feet distances from an eye chart.

5. 20/60,70,80 vision:

In this vision level a person can see at a distance of 20 feet and a normal vision person can see at a distance of 60, 70, and 80. A person is able to read large headlines of a newspaper. You can wear 3M safety Glasses to read any print material easily.

4. 20/200 vision:

In this level of vision, a person is considered to be legally blind. In this vision level, a person can see at a distance of 20 feet away. While a normal vision’s person can see at a distance of 100 feet away.

Types of Vision

Blindness

The word blindness is used for complete or nearly complete vision loss, which is not correctable by standard glasses, contact lenses, or medicine. Common causes of blindness are macular degeneration, infections of the cornea or retina, glaucoma, traumatic injuries, diabetes, etc. The treatment and prognosis for blindness is dependent on its cause.

Cataracts

Cataract is a clouding of the eye’s natural lens, which lies behind the pupil. Most cataracts are related to aging and can occur in both the eyes. Surgery is the only way to remove a cataract and is usually safe and effective, resulting in improvement of vision. Most common symptoms of a cataract are cloudy, blurry, or misty vision.

Color Blindness

Color blindness, also known as color vision deficiency (CVD), is a deficiency in the way you see a color. It affects males more frequently than females, red-green color deficiency is the most common form of color blindness. Color blindness is hereditary and is passed on from mother to son. It can also be caused by eye diseases, aging or retina damage.

Diabetic Retinopathy

Diabetic retinopathy is most common among people with diabetes. Diabetic retinopathy affects when high blood sugar levels cause damage to blood vessels in the retina causing it to swell and leak. It can cause blindness if left untreated. It can be prevented with early detection, diabetes management and routine eye checkups.

Dry Eyes

Dry eyes is a condition in which eyes do not produce enough tears to lubricate the eye surface, resulting in eye irritation and vision problems. It may be caused by diseases, aging, medication, and eye structure problems. Symptoms may include itching, blurry vision, pain or redness and is treatable by a medical professional through prescriptions and lubricating eye drops.

Most Common Adult Vision Problems

  • Blurred vision (called refractive errors)
  • Age-related macular degeneration
  • Glaucoma
  • Cataract
  • Diabetic retinopathy

Most Common Childhood Vision Problems

  • Blurred vision (called refractive errors)
  • Crossed eyes (called strabismus)
  • Lazy eye (called amblyopia)

Blurred vision (refractive errors)

  • Nearsightedness (called myopia) is when you can see clearly up close but blurry in the distance.
  • Farsightedness (called hyperopia) is when you can see clearly in the distance but blurry up close.
  • If you are older than 40 and have trouble reading small print or focusing up close, this is usually due to a condition called presbyopia. One in every three people 40 years or older in the U.S. will need glasses to read smaller print.
  • Astigmatism is another condition that causes blurred vision, but it is because of the shape of the cornea.

These conditions affect the shape of the eye and, in turn, how the eye sees.  They can be corrected by eyeglasses, contact lenses, and in some cases surgery.

Crossed Eyes (strabismus)

Strabismus occurs when the eyes do not line up or they are crossed. One eye, however, usually remains straight at any given time. Common forms of strabismus include:

  • Esotropia – one or both eyes turn inward toward the nose
  • Exotropia – one or both eyes turn out; also called wall-eyed
  • Hypertropia – one or both eyes turn up
  • Hypotropia – one or both eyes turn down

If detected early in life, strabismus can be treated and even reversed.

If left untreated strabismus can cause amblyopia.

What are the risk factors for strabismus?

  • Family history of strabismus
  • Having a significant amount of uncorrected farsightedness (hyperopia)
  • Disabilities such as Down syndrome and cerebral palsy
  • Stroke or head injury

Lazy Eye (amblyopia)

Amblyopia — often called lazy eye — is a problem that is common in children.

Amblyopia is a result of the brain and the eyes not working together. The brain ignores visual information from one eye, which causes problems with vision development.

Treatment for amblyopia works well if the condition is found early. If untreated, amblyopia causes permanent vision loss.

What are the risk factors for amblyopia?

  • Premature birth
  • Low birth weight
  • Retinopathy of prematurity diagnosis
  • Cerebral palsy diagnosis
  • Intellectual disability diagnosis
  • Family history of certain eye conditions
  • Maternal smoking, drug or alcohol use
  • Surgery on eye muscles for esotropia (eyes turn in toward nose)

How Does Vision Loss Occur?

Vision loss occurs when a part of the eye is damaged by some disease or an abnormality. Depending on the specific eye disease, functional vision can be impaired in different ways. Vision loss can occur at any age, even from birth due to congenital diseases, such as congenital glaucoma or cataracts. Vision loss in mid-life can be caused by diseases such as diabetes or glaucoma. There are also rare inherited retinal diseases such as Stargardt disease or Retinitis Pigmentosa that cause vision loss. For people in later years of their life, vision impairment due to eye diseases are more common, such as Age-related Macular Degeneration (AMD). AMD is termed as the number one cause of vision loss around the world for those aged 65 and above. Other eye diseases causing vision loss such as diabetic retinopathy, glaucoma and inoperable cataracts are also highly prevalent in ages 50 and above.

What are the Most Common Types of Vision Loss?

There are two types of vision loss: Central vision loss and peripheral vision loss. The type of vision loss you get will depend on the type of eye disease you have. Mostly, one of the above, i-e central or peripheral vision, is affected, but there have been cases where vision loss was found in both forms at the same time.

  • Central Vision Loss

This type of vision loss usually occurs from damage to the area known as the macula, the very center of the retina. Some diseases only affect the macula, while others can damage other parts of the retina as well. Losing central vision will feel like missing detail or seeing blur spots in the center part of your visual field. As the damage progresses, the blur spots will turn into dark or blank spots.

  • Peripheral Vision Loss

Peripheral vision is what you see on the sides without turning your head. When you lose peripheral vision, you will feel the world closing down on you. You’ll see things in the center clearer and brighter as compared to things on the side. Experiencing vision loss in such a way leaves a patient with only central vision, a condition also known as tunnel vision. This may be accompanied by difficulty seeing at night, loss of night vision, or in dim lit environments.

Bat Removal And Bat Control

How to get rid of bats

Firstly and most importantly, bats and their roosts are protected by law so you should never try to remove a bat from your home yourself. Bats spend most of the winter hibernating until they wake in April time looking for food in the evenings.  Bats are most active from April to October. By September and October, bats will have mated and will start to build up fat reserves for hibernation in December.

Bats are important to our world because some plant species rely on bats to pollinate their flowers. Bats are insect eaters so they also make good pest controllers.

Finding a grounded or lost bat is a unique experience. For many people, it will be the first time they come close to one of these fascinating and unappreciated creatures. And knowing you’ve helped a bat survive is a feeling like no other!

unfortunately don’t have the resources to run a bat rescue service – but don’t worry. You can help the bat by following a few simple steps, and the National Bat Helpline may be able to point you toward experienced independent volunteers in your area who can take over from there. If not, you can take the bat to your nearest veterinary practice, and we will advise and support them.

Does the bat need help?

A bat needs help, and should not be left or released without advice, if:

It’s on the ground or floor

It’s exposed during the day (e.g., on an external wall)

It’s in the living area of a dwelling, or the public area of another building

It’s been in contact with a cat

It’s a pup without its mother (see below)

It’s stuck to something (like flypaper, barbed wire or a fishing hook)

Its roosting place has been disturbed – for example, by removing wood from a woodpile, taking a sign from a wall, or building work. If a bat has been found during building work, there are some additional things you’ll need to do to ensure that the roost is retained and the law is not broken.

How to Get Rid of Bats

As scary as they may appear, bats are actually quite benign and even shy. Though they may qualify as nuisance pests, knowing their behavior will help you to keep your home environment free of bats while letting them play their pest control role within the food chain.

Physical Characteristics

All bats have the same general shape and webbed wing structure.

The larger bats (“megabats”) may carry a wingspan of up to five feet and a weight of slightly more than two pounds. The smaller type (called “microbats”) may have a wingspan of about six inches and weigh less than one ounce.

A bat’s flight is more sporadic and swooping than a bird’s movements.

The face may resemble that of a Chihuahua.

Some bats live together in colonies typically ranging from 100-1,000 individuals. Others are solitary and live alone.

Roughly 40-50 bat species call the U.S. home, and more than 1,200 species have been discovered worldwide.

Life Cycle

There is a balance between a female bat’s slow reproductive rate (one to two babies, called pups, each year) and a bat’s fairly long life (up to 20 years). Yet because females produce few young, and because of predators like hawks, owls, and even snakes, their populations are prone to thinning numbers or extinction.

Mating season occurs during fall, with males and females meeting to breed in hibernation sites. After the pups are born during springtime, groups come together to form maternal colonies. The mothers leave at night to find food and water and return later to nurse. The pups fly away after one month, usually in the summer. Because the young are unaccustomed to flying and to the area in general, they’re the ones most likely to stray into a human residence by accident.

Understanding a Bat’s Behavior

If you are frightened by bats, know that many other people feel the same. Yet when you understand a few of their behaviors, you’ll realize why they’re generally harmless to humans

How To Get Rid Of Bats: The Complete Guide

Most people don’t like bats and would rather keep them away. Bats are found in most places. This means that bats may live on your property, be found in your attic, or hang out under your porch eaves. If you want to keep bats away, your approach will vary, depending on where the bats are congregating. This article will cover these main points.

How To Get Bats Out Of My Attic

In addition to the steps mentioned in this article, there are specific steps that you can take to eliminate bats from your house. Often bats will live in an attic for a long time before they are discovered. This means that simple decoy and other devices are not usually effective. The attic has already become much too appealing to the bat colony.

Locate All Entrance Points To Your House

Be aware that bats can enter an area in a space as small as a quarter. ⅜ of an inch is all it takes for a bat to crawl in. They love long narrow spaces because it offers them great protection. They also love to enter vía small entryways because predators can’t follow them.

That often means that the most obvious entrances are not the ones that bats use the most. It also means that the entrances that bats use may be difficult to locate. To find where bats are going in and out, watch your house. You will need to have enough people located around the perimeter to watch the entire house.

Set Up A Bat House Near The Main Entrance-Exit Point

The purpose of a bat house is to provide an alternative and safe place for the bats to roost. Bats are incredibly helpful to the local ecology and they keep insect populations greatly reduced. But, because of human encroachment into the wild, bats have become increasingly endangered. They are protected in most areas.

Bat Crazy!: Guide To Bat Removal From Attics

As a responsible homeowner, it seems as though your to-do list is never going to end. There’s always another repair or maintenance job for you to consider. After all, consider the following statistic regarding homeowners throughout the United States. It indicates that, on average, homeowners spend around one to four percent of the home’s overall value on improvement projects. In other words, you’re not alone in needing to care for your home every now and then.

Perhaps, though, you have a peskier problem. You might be looking for strategies for bat removal from attic spaces. You’ve noticed some flying, furry housemates you need to relocate. If that’s the case, you’re in luck. The good news is, you’ve come to the right place with this article.

Peek Your Head in the Attic to Confirm You Have a Bat Problem

Imagine you’re sitting in comfort on your couch after a long day at work. Out of nowhere, you hear something overhead bustling around. The thing is, your home only has one story! So, you assume an animal has made its home in your attic. Don’t jump to conclusions as to what kind of animal is sharing your house, though.

Consider Investing in Repellents

Perhaps your bat infestation is rather small compared to others. Only one or two have visited your attic in the wee hours of the morning. If that’s the case, you still want to act upon getting the situation under control. Unhandled, the bats can start to grow a real family right under your roof. To avoid an increase in the problem, remove any bats from your attic as soon as you notice them.

Hang Some Aluminum Foil and Mirrors in Your Attic

Perhaps you don’t want to rely on chemicals or foods to expel bats from your attic. Well, there’s another option to consider. It’s a common and incorrect myth to assume that all bats are blind. On the contrary, bats can see quite well. Rather, they rely more on hearing their high-pitched navigational noises.

How to get rid of Bats

What is the best way to get rid of bats? You have two options: repelling bats from your house and mounting an alternative house for them in the yard. The former is a short-term solution while the latter will allow you to solve your bat problem for a long time.

Electronic deterrents repel bats with light, sound, or airflow and are more efficient against bats.

Having bat infestation in the attic sounds terrible to many homeowners. Upon hearing these words, particularly when it comes to a large colony established by these animals, one would wish just to give up everything and start looking for a new home. The reason for that is that numerous myths have grown up around bats, making people fear these flying creatures, instead of learning how to get rid of bats properly.

The biggest myth about bats is that they are vampires feeding on human blood. In most cases it is not true. Yes, there is a particular sub-species, which specifically prefers blood (what is meant here is animal blood, not human one). This species is dangerous and can carry diseases, but you’ll have to try hard to encounter them and should attack them first to get bitten for sure. The vast majority of bats that inhabit human accommodations feed on insects (mosquitoes, flies, etc.), or, less frequently, on small animals such as frogs.

Therefore, these pests are not exactly pests. They can be “tamed” and you can build special bat shelters for them (refer to our separate article covering the best bat houses). But still, there are species that feed on fruit causing damage to horticulture. It would therefore be preferable to keep these creatures away. These are covered in the following review.

Maintenance Of Your Truck Is Directly Connected With Your Truck Tires Condition

Secret Tips To Buy Truck Tires and Save Money

One of the things I tend to always stress is safety. This is one of the most important things any operation should consider. With that in mind the other key consideration is of course, proper maintenance of all equipment.

Your vehicles and trailers should always have a regularly followed maintenance schedule. Your drivers should always conduct checks of their trucks. Safety and maintenance, these two things are very important!

Some of the larger shops are able to have a proper maintenance support staff available on hand. It is their responsibility to ensure they conduct proper inspections. However it is also the driver’s responsibility to inspect his/her truck and to report any deficiencies found.

Smaller shops might have to set up a contract with other service centers to handle maintenance needs. That makes it all the more vital that they keep a close eye on their equipment. What might appear to be a small issue, can grow into a large problem if not taken care of right away.

This brings us to a key factor, where the rubber meets the road. That right, your tires. People often don’t think about them. Sure they check the oil, fuel, radiator and other fluids. But your tires are the number one thing you should check every time you (or your driver) stop.

What are you checking for?

  • Uneven tread wear, the tread is more worn on the edges or in certain spots
  • Shallow tread, your tire tread should be at least 1/16 of an inch deep.
  • Check in the treads for nails, sharp rocks, broken glass
  • Damaged areas like tears, cracks, bubbles

Tire Pressure

One of the most crucial ways to save money on your truck is to keep your tires properly inflated. By checking your tires monthly, you could save a noticeable amount of fuel and money. Always check the spare tire, too.

Unbalanced tires lessen your control of the vehicle. The tires will also wear unevenly and even prematurely if not equal to their counterparts.

There is a common misconception that you should run with different tire pressure, depending on the season. Always keep your tires inflated to the manufacturer’s suggested pressure. You should check the pressure often regularly, but even more often in colder temperatures.

Remember that a cold tire may cause your car’s computer to flash a “low tire pressure” symbol. If this occurs, visually inspect your tires, and if they appear normal, chances are that the sensor has misread the inflation, due to the weather.

Tire Mounting and Balancing

Tire Mounting and BalancingTire mounting and balancing are commonly required services for vehicles. Tires are expensive units themselves, so it is important to keep them in top condition so that they last.

Keeping your tires balanced directly correlates with how often you will need to replace them. Whether you are buying new tires or simply need a tire rotation, your tires should have the correct balance.

Tire balancing ensures the weight of your vehicle is distributed equally on the axle. When your tires are out of balance, your vehicle produces a lower-quality ride, and it wears down the suspension.

The benefits of good tire upkeep can save money for a commercial business in the long run. With properly executed balancing and mounting, money is saved through tires, fuel and the inevitable repairs that come from neglected maintenance. These services for commercial businesses, as well as electronic and dynamic tire balancing, are crucial for a working fleet.

Here are the things you need to see if you are looking to purchase tires online:

  • Durability: The basic requirement when buying a tire is durability. Everybody wants value for his or her hard-earned money and many people perceive it through the resilience of the product. It is justified too, because if a tire does not last long enough to recover its costs and help make a profit, then it’s not a good deal.  As such, you should go through various brand reviews online and choose the one that you think is durable enough for your particular business.
  • Cost: Cost is certainly a high priority because the choice of the right tire depends on the budget. This is another reason why people purchase used tires. However, though budget is important, it is certainly not worth more than your safety. Thankfully, there are various deals available online that help you get the right tires within your budget.
  • Comfort versus Endurance: People often find themselves in a dilemma choosing the correct truck tires such as 11R22.5 or 11R24.5 and etc… Soft tires provide more traction and grip while hard tires are more durable. If faced with this situation, you should try to maintain a balance between these two aspects. Most online sites let you specify the parameters as per your needs and give you the options that let you select and buy the tires you prefer.
  • Climate: Choosing the perfect tire also depends on the weather conditions. Soft tires can easily expand and contract in changing weather conditions where as in long haulage on highways it is always better to choose hard tires. Many high-quality tires are available at online websites that stock the most durable and renowned brands that can withstand the climate and the test of time.
  • Technicalities: You should know your tire before buying it. Make sure that the websites have all specifications you need for selecting the correct tire. Technical information you need to check includes maximum speed, load capacity, heat durability and proportion specs. Most of these details are provided on the side of the tires in the form of a code that is easily understandable. You can also use the picture of the tire on the site to understand the tire’s capabilities and make your selection.

Truck Lift Kits: What’s the Right Height for Your Lift?

If you’re thinking about lifting your truck, the next question often boils down to how high are you willing to go? Lift kits come in all different sizes, including smaller kits that lift your truck by about two inches, all the way up to large lift kits that raise your truck by as much as ten inches or more. While just a few inches might not sound like that much of a difference, there are plenty of considerations to keep in mind. Run through our truck lift kit checklist to find the right height for your lift. 

Choosing the Right Height for Your Lift:

Check Your Make and Model

Different makes and models come with their own suspension specifications and requirements. Some vehicles may come with certain limitations in terms of lifting. Depending on the make and model, you may need to invest in additional modifications if you choose a higher lift, such as extended brake lines, new steering components, and more. Make sure you know what’s involved with installing your new lift kit before you settle on a height.

Diving and Performance Considerations

Lift kits give you more ground clearance, but how much more clearance you need really depends on where you plan on driving. If you’re really tearing up the outdoors, driving over rock formations and through remote forests, a slightly larger kit may come in handy.

If you still want to use your truck for everyday errands and getting to and from work, you’re probably better off with a smaller lift or even some leveling kits for a slight height increase in the front. Larger lifts will start to deplete your trucks’ fuel economy. It can also alter the center of gravity, which can make turning a little trickier. If you want to retain a factory-like ride quality, stick with a smaller lift.

Making Room for New Tires

Many folks invest in lift kits, so they can make room for larger tires. The size of your lift kit also depends on how large you want these tires to be. You should be able to make room for some 37-inch tires with a smaller lift kit, but, if you want to go even bigger, you’ll probably need a larger lift kit. Some people love driving a truck with massive tires that eat up the road, but, if you prefer a more traditional driving experience, less is more when it comes to your lift.

Set Your Budget

Another consideration to keep in mind is how much you’re willing to spend. As you might’ve guessed, larger lift kits tend to be more expensive than their smaller counterparts. The higher you raise your vehicle, the more you’ll need to spend on additional modifications, such as new steering components, brake line extensions, and other accessories and upgrades. The kit itself will also be more expensive, usually costing around several thousand dollars.

Driving Experience

Another factor to consider is how comfortable you feel driving a lifted truck. Raising the body of your vehicle by more than a couple inches can get you into trouble in terms of the overall performance and drivability of your truck. Unless you’re well-versed in the world of vehicle lifts, it’s best to start small and work your way up to a larger lift.

Starting with a two-inch kit is a great way to learn more about the lifting process and how it feels to own and drive a lifted truck. If you go too large too fast, you might run into some problems down the road. You can always upgrade to a large lift later on.

 Read Up on State and Local Laws

Last, but not least, choosing the right height for your lift might not be solely your decision. Some states and cities have strict laws regarding vehicle suspension. If you raise your truck too much, you could be in violation of some of these laws, which will limit you in terms of where you can use your new lifted truck. If you want complete freedom on the road and more peace of mind knowing that you’re not violating any laws, you’ll be better off with a smaller lift kit. Research the vehicle suspension laws in your area to get a better idea of what your options are.